Three Key Concpets to Perfect your Deadlift – by James Owen
The Deadlift is often thought of as the best all round exercise as it makes use of the entire lower body, core and posterior chain. However, it is also the one exercise I see being performed with the worst form. I know we have all seen that one guy in the gym with way too much weight on the bar who then proceeds to do a deadlift while resembling the shape of a banana. So with that being said in this article I am going to be discussing 3 Key Concepts that will help you perfect your deadlift:
Understanding the “Hinge” Aspect of a Deadlift
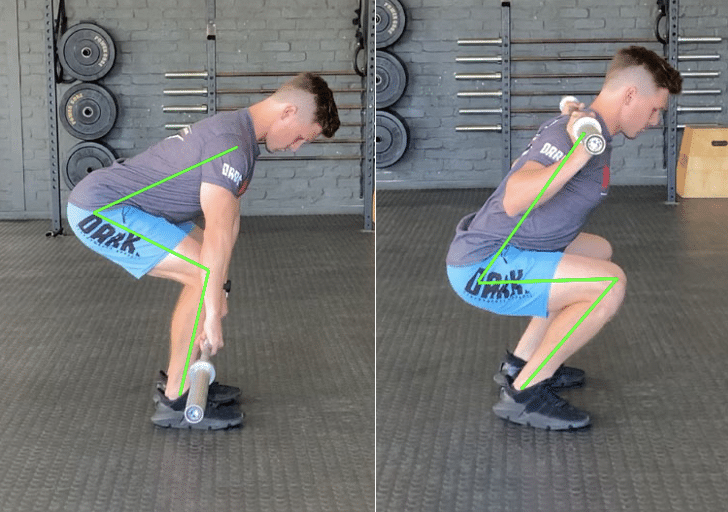
When discussing functional exercises, the deadlift is classified as a hinging exercise. A Hinge exercise is defined as an exercise where you bend forward with maximal motion at the hip and minimal motion at the knees (i.e., Lowering the weight through the hips and not through the knees). This definition is extremely important as, the number one mistake I see when coaching the deadlift is that the athlete is Squatting more than they are hinging. What this means is that they are having minimal movement at the hip while having maximal motion at the knees (i.e., Lowering the weight through the knees and not the hips). You can see the difference in the image below comparing the bottom position of a Squat and Deadlift.

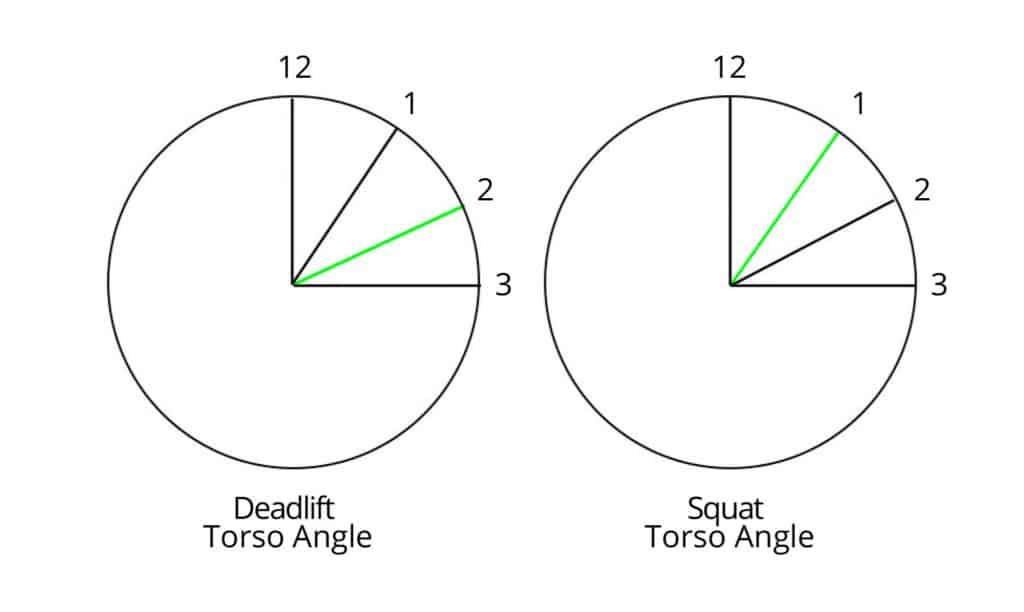
In the deadlift you can see my hips are pushed as far back as possible while my knees remain behind my toes and my torso is hinged over into a 2 o’clock position. When looking at the squat, my hips aren’t pushed back nearly as far, my knees are over my toes and my torso position is far more upright in a 1 o’clock position.

Bar Path & Body Position
The concept of bar path and your body’s position in relation to the bar is simple to explain but complicated to execute.
Simply put the bar needs to move in a straight vertical line from the bottom of the lift to the top while it is kept as close to your mid line a possible. Keeping the bar close to your midline simply means keeping the bar as close to your body as you can throughout the entire lift.
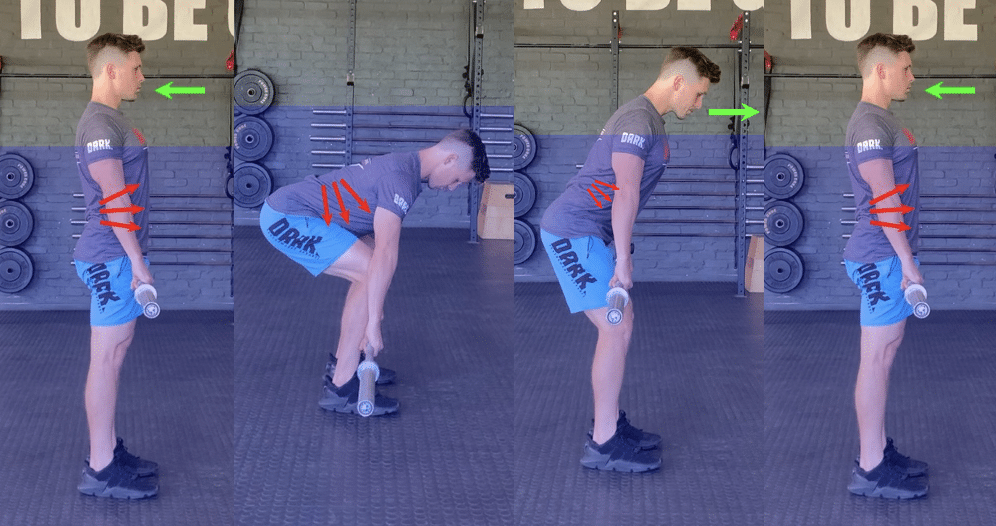
In order to do this your hinge mechanics need to be flawless. In the images below I will take you though one full deadlift rep from start to finish discussing points regarding body position and bar path along the way

Step 1: Shoulders Back & Bend the Bar
When coaching Deadlift technique I like to start the lift from the top position as this helps the client better understand the steps involved. When at the top of the deadlift, before starting the lift I am setting my shoulders back, driving my chest through and engaging my lats by externally rotating my arms (for this think about bending the bar or trying to snap it in two).
Step 2: Hips back, Chest over
To initiate the Hinge portion of the Deadlift you need to simultaneously push your hips back and bring your chest over as a counter balance while maintaining a neutral spine. While doing so it is important to keep your shoulders over the bar and the bar in contact with the thigh (as close to midline as possible).


Step 3: Getting the bar past your knees
Here comes the most tricky part of the Deadlift, getting the bar around your knees without breaking neutral posture/form. Following on from step 2 you will need to continue pushing your hips back as far as they will go while bringing your chest over. Once your hips reach this position you should feel a stretch in your hamstrings and your torso should be at the 2 O’clock position. Now considering you have good flexibility and mobility the bar should be past or at your knees while your shoulders are directly over the bar and your shins are vertical. (in the image you can see I am not perfect as my flexibility and mobility needs work…we are all human)
Step 4: Lowering to the bottom position
Now in order to lower yourself into the bottom position while minimizing knee bend and keeping a neutral spine you will need to externally rotate your thigh in order to lower yourself through your hips and not your knees (the cue I like to use for this to push your knees out). You will also need to keep your arms externally rotated to keep your lats engaged as this will help you remain in a neutral spine while lowering.
Step 5: Lifting back to the top
In order to lift the weight back to the top position, I want you to think about pushing the ground away from you while maintaining external rotation in your arms (Bend the bar) and thighs (knees out). If all is done correctly you should see your hips and chest rise at the same time while maintaining a neutral spine throughout the lift


Step 6: Finishing the Rep
When coaching my clients I make sure that the finish the lift with their hips in a neutral position as this sets them up for their next rep. To get your hips into a neutral position you need to rotate your hips by trying to tuck your tail bone under your glutes. Then your start the process all over again.
My favourite thing to say to a client that needs to focus on their form is “I want your to think of 1 set of 5 reps as 5 sets of 1 rep” as this slows them down and makes them think of each rep as an individual lift thus bettering their form.
Core Bracing: A How to Guide and how to incorporate it into your lifting
Although Core bracing is not an inherent part of deadlifting, it is an inherent part of lifting weights which is why I want to talk about it. The purpose of core bracing is to brace and stabilise your spine in a neutral position during a lift, in this case specifically a deadlift.
Core bracing is done through, creating pressure in your abdominal cavity by breathing through your diaphragm and then tensing all the surrounding core muscles. As a coach I have found the best que to coach diaphragmatic breathing is to tell your client to belly breath. As for tensing the surrounding core muscles simply tell your client to brace as if they were about to be hit in the stomach. Once they understand this you can simply cue them by telling them to make everything tight or to create tension.
When incorporating this into your lift I like to tell my client to find rhythm through their breathing. What I mean by this is each and every lift they need to breathe in a brace the exact same way on every rep. This keeps your breathing pattern consistent and prevents you from getting out of breath while resisting heavy weight. The Cue I like to use is to tell the client there is water that is sitting chest height and in order to perform the lift they will need to breathe and brace, “go underwater” while doing the lift and then only exhale once they are back above the water. This simply helps the client understand when to initiate the bracing, how long to hold it for and when you can release the bracing

Go Underwater -> Breathe in & Brace -> Exhale & Finish Rep

